
December 2015
Olympus OM-D E-M1 powered all day with PowerGorilla Professional Battery
13/12/15 10:48
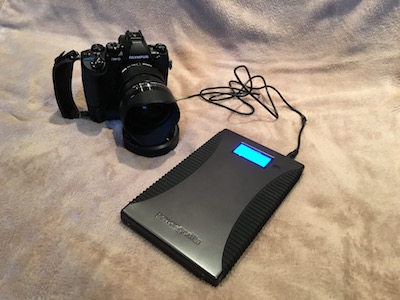
Made up a cable last night so I can run my camera off a large battery. Means I can shoot panoramas all day in the wild if I want to.
Tricky to put al the bits together. No one makes the actual cable. Olympus in their wisdom went for a plug/socket on the camera that's unique to them. Very naughty really, nothing at all to do with them trying to sell you their AC power supply for £80?
Luckily the nice ExPro people will sell you an equivalent for £13 on eBay. So that the fancy camera plug taken care of.

I had a few spare leads that came with my PowertTaveler PowerGorilla Pro battery so a few minutes work with scissors, solder and self-amalgamating tape I have a lead! It works too, which is nice. I made sure to check the polarity with my little voltage meter. I should now test it to see how many shots I can take with it.
I had the battery already, used most often on 2 week long sea-kayaking trips to keep some vital navigation gadgets working. PowerTraveller make lots of smaller, cheaper ones.
Note the PowerGorilla Pro has a number of outputs, normal 5v USB and a more conventional single pin socket where you can vary the voltage from 8.4v to 24v. If you're thinking of using a smaller, cheaper battery, one that only has a USB socket won't be any good as far as I can tell.


The Olympus AC-3 AC Adapter is rated at 9V DC, 3000mA. The PowerGorilla Pro puts out 5V - 24V and 21000mAh. I might get 7 hours of continuous shooting?
SSDs, Trim and Mac OSX El Capitan
10/12/15 18:00
I've been doing a little research into SSDs and OSX, so here is what I've discovered…
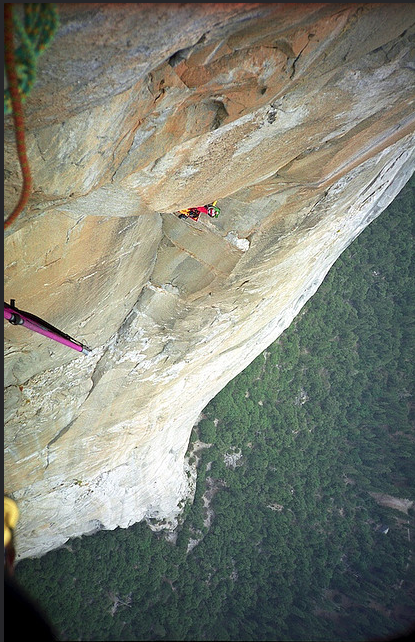
me and my pals on The Shield, El Capitan, October 2003
The Chronology
Solid State Drives (SSDs) first appeared in 1976 as hugely expensive rack mounted storage for mainframe computers. 256kb cost $9700 in 1977.
Intel 'Bubble Memory' started to be offered in laptops in the early 1980's. 128kb retailed for $895.
Modern SSDs as we know today first emerged in 1995, based on the 3.5inch form factor. Mainly used as cache drives in desktop machines.
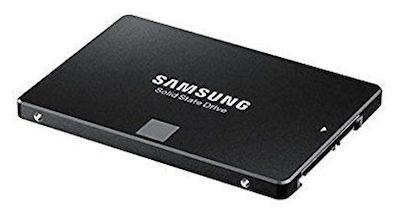
Flash SSDs went mainstream in 2006 when Samsung released a 2.5inch 32gb drive for $699.
Today, in 2015, Samsung will sell you a 2TB SSD in a 2.5inch package for your laptop or desktop computer. Available for around £500 to £600 on eBay in the UK.
Advantages of using SSDs
Users love any computer that runs off an SSD - they transform even quite average laptops into super fast performers. Boot up or startup from sleep is nearly instantaneous and most normal operations are speeded up amazingly.
Once you've got used to a computer with an SSD as its startup drive you certainly notice the difference going back to a conventional computer with physical (spinning rust) disks and its slow startup time.
For me, stitching large 80mpixel panoramas, which are too big to hold in memory, an SSD will make a huge difference in rendering times.
Trimming
SSD drives, being solid state, work slightly differently to conventional spinning hard drives. Normal HD's simply mark deleted space as available to use, the drive doesn't know the space is free until it is overwritten. The internal firmware continues to do 'garbage control' on this space as if it held data, until it is overwritten.
SSDs can benefit from an additional command to tell it earlier that the space is available, so it doesn't have to do this internal, drive level, garbage collection quite so often. This is known as 'Trim'.
Without Trim, SSDs may have a tendency to slow down and appear fuller than they actually are. They should still work though.
What is Trim Support
Trim is an ATA command, sent to the SSD master controller by the operating system to tell it what data address is “invalid”, which will greatly reduce the burden of writes, while allowing SSD better pre-delete the unused data blocks in background, so that these blocks can prepare new write faster. 1
Mac OSX and Third Party SSD Trim Support
Trim has evolved over time like all computer technology. When Apple first released laptops with SSD drives they enabled Trim support in the OS as they were selling you the complete package and had tested the kit together to make sure it all worked fine.
Apple did not enable their OS to use Trim with any 3rd party SSD drives. This could be seen as sensible at the time as not all Trim enabled SSD drives worked the same way. The danger was if you used 'the wrong one' then the Apple Trim command could literally destroy your SSD and all of the data held on it.
Many users smelt a rat and believed Apple was crippling the use of 3rd party SSD drives intentionally so that users were compelled to buy the expensive Apple version.
Of course - nothing could be further from the truth
Thirty party developers quickly stepped in and produced hacks to the OS to enable Trim on any 3rd party SSDs, so everyone was happy. 2
'Trouble was these hacks worked at such a low level that whenever Apple released an incremental OS update it (unintentionally of course) broke the hack, and sometimes, so people claimed, broke their SSDs and destroyed all of their data.
Clearly a bit of a mess.
El Capitan comes to the rescue
Increasingly aware of the bad reputation starting to build on this issue, Tim Cook, in mid-2015 announced that from now on, Apple will enable the Trim command natively in the next release of OSX El Capitan.
This is clearly great news. No OS level hacks are required, or third party software, just a simple one-time, one-line command in the Terminal will switch on Trim on any Mac running El Capitan or later, for ever.
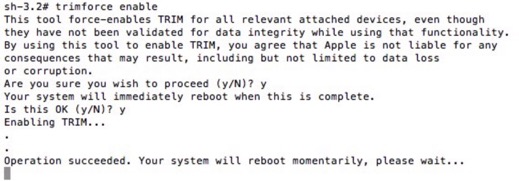
How to enable Trim support in OSX El Capitan
From the terminal enter:
 3
3
: sudo trimforce enable
Apple will warn you about using 3rd party drives, it's up to you to check they will work ok with the Mac, most modern ones are ok I believe.
 4
4
I am looking forward to adding a 2TB SSD to my Mac Pro
Tower (2010 vintage) as soon as funds allow
Note
SSDs don't seem to last forever. Over time the chips do apparently wear out. For example, Samsung currently guarantee their 850 Pro range to be at 75% capacity after 10 years of use.
Some SSDs don't use Trim, these are the ones that connect to a desktop machine via the internal PCI bus, they use their own controller to manage data deletion. Trim is an ATA command only.
KR December 2015
1 https://www.jailbreakiosx.com/2015/06/how-to-enable-trim-for-third-party-ssd-in-os-x-el-capitan.html
2 https://www.cindori.org/software/trimenabler/
3 https://www.jailbreakiosx.com/2015/06/how-to-enable-trim-for-third-party-ssd-in-os-x-el-capitan.html
4 http://9to5mac.com/2015/06/12/os-x-ssd-trim-support-el-capitan/
me and my pals on The Shield, El Capitan, October 2003
The Chronology
Solid State Drives (SSDs) first appeared in 1976 as hugely expensive rack mounted storage for mainframe computers. 256kb cost $9700 in 1977.
Intel 'Bubble Memory' started to be offered in laptops in the early 1980's. 128kb retailed for $895.
Modern SSDs as we know today first emerged in 1995, based on the 3.5inch form factor. Mainly used as cache drives in desktop machines.
Flash SSDs went mainstream in 2006 when Samsung released a 2.5inch 32gb drive for $699.
Today, in 2015, Samsung will sell you a 2TB SSD in a 2.5inch package for your laptop or desktop computer. Available for around £500 to £600 on eBay in the UK.
Advantages of using SSDs
Users love any computer that runs off an SSD - they transform even quite average laptops into super fast performers. Boot up or startup from sleep is nearly instantaneous and most normal operations are speeded up amazingly.
Once you've got used to a computer with an SSD as its startup drive you certainly notice the difference going back to a conventional computer with physical (spinning rust) disks and its slow startup time.
For me, stitching large 80mpixel panoramas, which are too big to hold in memory, an SSD will make a huge difference in rendering times.
Trimming
SSD drives, being solid state, work slightly differently to conventional spinning hard drives. Normal HD's simply mark deleted space as available to use, the drive doesn't know the space is free until it is overwritten. The internal firmware continues to do 'garbage control' on this space as if it held data, until it is overwritten.
SSDs can benefit from an additional command to tell it earlier that the space is available, so it doesn't have to do this internal, drive level, garbage collection quite so often. This is known as 'Trim'.
Without Trim, SSDs may have a tendency to slow down and appear fuller than they actually are. They should still work though.
What is Trim Support
Trim is an ATA command, sent to the SSD master controller by the operating system to tell it what data address is “invalid”, which will greatly reduce the burden of writes, while allowing SSD better pre-delete the unused data blocks in background, so that these blocks can prepare new write faster. 1
Mac OSX and Third Party SSD Trim Support
Trim has evolved over time like all computer technology. When Apple first released laptops with SSD drives they enabled Trim support in the OS as they were selling you the complete package and had tested the kit together to make sure it all worked fine.
Apple did not enable their OS to use Trim with any 3rd party SSD drives. This could be seen as sensible at the time as not all Trim enabled SSD drives worked the same way. The danger was if you used 'the wrong one' then the Apple Trim command could literally destroy your SSD and all of the data held on it.
Many users smelt a rat and believed Apple was crippling the use of 3rd party SSD drives intentionally so that users were compelled to buy the expensive Apple version.
Of course - nothing could be further from the truth
Thirty party developers quickly stepped in and produced hacks to the OS to enable Trim on any 3rd party SSDs, so everyone was happy. 2
'Trouble was these hacks worked at such a low level that whenever Apple released an incremental OS update it (unintentionally of course) broke the hack, and sometimes, so people claimed, broke their SSDs and destroyed all of their data.
Clearly a bit of a mess.
El Capitan comes to the rescue
Increasingly aware of the bad reputation starting to build on this issue, Tim Cook, in mid-2015 announced that from now on, Apple will enable the Trim command natively in the next release of OSX El Capitan.
This is clearly great news. No OS level hacks are required, or third party software, just a simple one-time, one-line command in the Terminal will switch on Trim on any Mac running El Capitan or later, for ever.
How to enable Trim support in OSX El Capitan
From the terminal enter:
: sudo trimforce enable
Apple will warn you about using 3rd party drives, it's up to you to check they will work ok with the Mac, most modern ones are ok I believe.
4I am looking forward to adding a 2TB SSD to my Mac Pro
Tower (2010 vintage) as soon as funds allow
Note
SSDs don't seem to last forever. Over time the chips do apparently wear out. For example, Samsung currently guarantee their 850 Pro range to be at 75% capacity after 10 years of use.
Some SSDs don't use Trim, these are the ones that connect to a desktop machine via the internal PCI bus, they use their own controller to manage data deletion. Trim is an ATA command only.
KR December 2015
1 https://www.jailbreakiosx.com/2015/06/how-to-enable-trim-for-third-party-ssd-in-os-x-el-capitan.html
2 https://www.cindori.org/software/trimenabler/
3 https://www.jailbreakiosx.com/2015/06/how-to-enable-trim-for-third-party-ssd-in-os-x-el-capitan.html
4 http://9to5mac.com/2015/06/12/os-x-ssd-trim-support-el-capitan/
Skins
06/12/15 21:59
I’ve been fiddling a bit recently with the ‘skins’ for my panos. This is where I can add all sorts of extra features, like interactive maps, thumbnail sliders, pull down menus, etc.
I think the goal is to end up with ‘responsive’ skins that adapt to the size of screen being used by the end user, and making sets or groups of similar panoramas as easy to navigate as possible. This means pushing the software to do things it can't yet do very easily, and liaising with the developers to fix bugs and work on new features. Which is all good fun, but takes a lot of time!
The different scenarios as I see them are something like this:
- Simple single stand alone pano. Only needs a few on-screen buttons, if any.
- Landscape set of panoramas, needs some kind of interactive map. Often the individual panos are too far apart to be able to use on-screen hot-spots to move from one to the next. A thumbnail slider may also be an option.
- Interior tours of multi-floor buildings. Here pop-out floor map with radar beams, etc are a favourite. Slider can be used as well.
- Tours of buildings or exteriors where there are panos of exactly the same spot taken over a long period of time. This is a tricky one. One solution is a simple pull-down menu with labels like: "Cafe 2008, Cafe 2015". Maps and hot-spots wouldn't work here.
SSD's
05/12/15 09:52
I've decided to look into getting one of these:
A 2TB Solid State Drive (SSD). I can swap this with the startup drive in my main computer. It should make it work as fast and as easily as my Wife's laptop!! More importantly, it will dramatically speed up the stitching and rendering of my big 360° images, which come in at around 13000 x 6500 pixels at the moment (That's about 85mega-pixels btw)
Speed test of the current setup:
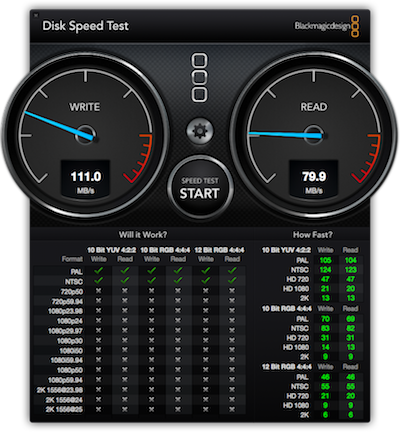
Will report back with the new speed test once it's in place.
A 2TB Solid State Drive (SSD). I can swap this with the startup drive in my main computer. It should make it work as fast and as easily as my Wife's laptop!! More importantly, it will dramatically speed up the stitching and rendering of my big 360° images, which come in at around 13000 x 6500 pixels at the moment (That's about 85mega-pixels btw)
Speed test of the current setup:
Will report back with the new speed test once it's in place.